Category Archives: Pork

Asian-inspired Peanut Butter & Hoisin Ribs


IMG_5759

Hello again from sunny Singapore! This weekend I was inspired to do something a little more akin to what the name of this blog suggests. Big Green ASIAN Egg… So I looked for a recipe to try out that was anything but standard.

Now you have to understand that our family are “rib connoisseurs” and when I suggest something new, eyebrows are raised as if to say, “if it isn’t broken, why fix it?”  That’s the fun in trying something new.

So for the brave, here’s an Asian inspired recipe that will surely please your friends when you suggest going off topic!

What you’ll need:

  • 2 racks of St Louis cut pork ribs – membrane removed
  • 3/4 cups hoisin sauce
  • 1/2 cup of crunchy peanut butter (we used Skippy)
  • 1/2 plum sauce
  • 1/4 cup oyster sauce
  • 1/4 cup rice wine vinegar
  • 1/4 cup dark soy sauce (the really thick kind!)
  • 2 tbsp dark sesame oil
  • 1 tbsp Thai chili sauce
  • 5 cloves of garlic, finely minced
  • 2 tbsp of finely minced old ginger

Combine by whisking the above ingredients, except for the ribs of course, in a medium sized glass bowl. You don’t want a reactive metal or a white plastic bowl as it will definitely stain.

Once done, reserve about 3 or 4 heaping spoons of the marinade for later. Leave it covered at room temperature. Now take your ribs, slice each rack in half and place them into a double bagged set of zip-top bags. You need to as the ribs are likely to punch a hole through the plastic. Having a second layer is just good insurance.

Spoon the thick, dark, tasty mixture into the bag and make sure you coats all sides of the ribs. Give it a good massage and then place the bags into a bowl and into the fridge. Normally I’d leave it overnight but alas I only had an hour before I had to put them on the grill. Still tasted amazing despite the hour long marination.

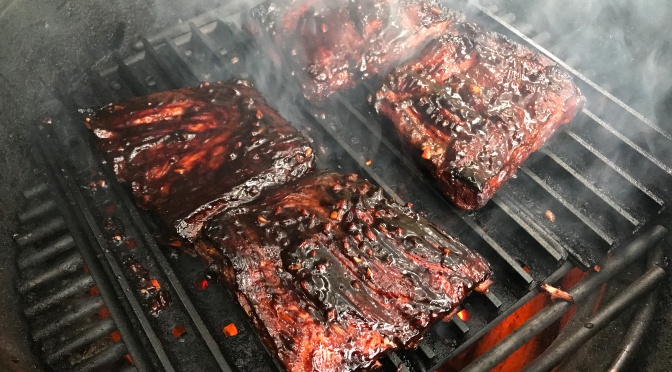
Set up your grill for indirect heat and place a water pan under the grid. This helps with catching the drippings but also provides a humid environment, leaving your ribs incredibly moist and juicy.

I used a handful of plum wood chips for this recipe. You can use anything you like but go easy on the smoke.

Remove the ribs from the bag and place them on a raised grill rack. All four will fit nicely. Set your ambient temperature to 225F (107C), place the ribs over the drip pan and close the lid. You’ll let these smoke for 2 hours.

Once done, carefully take the grill rack off the grid and wrap each rib section in a double layer of aluminium foil. I added a bit of apple juice to each packet for extra moisture during this stage. Now place the packets back onto the rack and back on the grid. Again, keeping a temperature of 225F (107C), close the lid and let them steep for 1 hour.

When the timer pings, remove the rack and carefully open each of the packets and place the ribs onto a place. Careful here as there’s a lot of steam and juices that will remain in the packet. Save that for basting! It’s ok to leave the ribs sitting uncovered for a while while you fire up the grill to SUPER HOT!

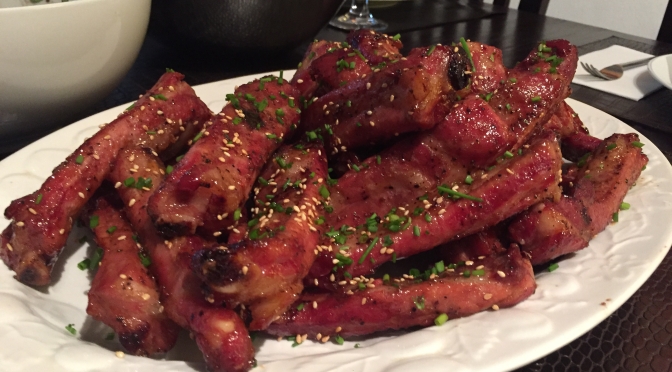
Using my trusty grill grates, I set the internal temperature up to about 500F (260C) for the final stage. When you’re ready, place the ribs meat side up onto the scorching hot grates. Keep your dome open during this stage as you don’t want the ribs to burn. Give the meaty side a baste with the marinade you set aside earlier. Keep flipping the ribs until you get a really nice char on both sides. Again, careful not to burn the sauce!

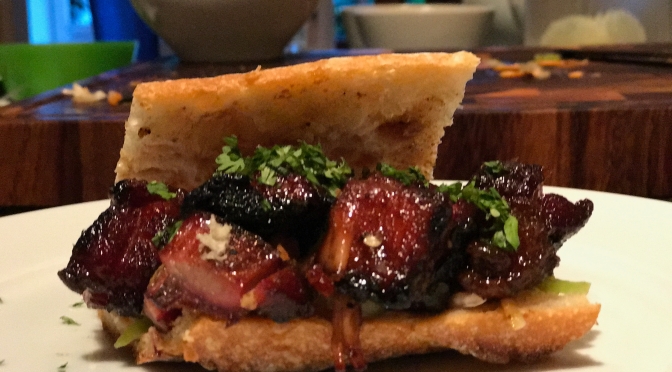
We served the ribs up with a radish, beetroot, carrot miso slaw and grilled corn with lime, mint, parmesan cheese.

The result was amazing! I got dinged on overall points because Heather ended up taking a fatty chunk of ribs. She’s not a fan of fatty ribs and neither should you! Not every rack of ribs will be award winning. Personally, I loved these ribs. They were juicy and super messy to eat. Great fun if you just don’t care about making a lip smacking mess!

This slideshow requires JavaScript.

Overall Heather Rating: 8.5/10

Smoked Pork Belly Burnt Ends – Bánh Mì


IMG_5669

So first and foremost, my apologies for the prolonged absence on this page. In fact, I’m a day short of 1 year since my last post. Don’t judge me. It’s just that I find microblogging on FB is a lot easier and done from the phone. That said though, I woke up early this morning, eager to tell you all about a new recipe we tried yesterday. Pork belly ‘burnt ends’ Bánh Mì. Its a mouthful to say and write but boy what a mouthful of taste when you bite into one of these succulent Vietnamese style sandwiches.

Bánh mì (/ˈbɑːn ˌmiː/[1][2][3][4] or /ˈbæn ˌmiː/;[5][4] Vietnamese pronunciation: [ɓǎɲ mî]) is the Vietnamese word for bread. Bread, or more specifically the baguette, was introduced by the French during the colonial period in Vietnam.[6] The bread most commonly found in Vietnamese cuisine is a single-serving baguette that is usually airier than its Western counterpart, with a thinner crust. Unlike the traditional French baguette, the Vietnamese baguette is made with rice flour along with wheat flour (see rice bread).

In Vietnamese cuisine, bánh mì is typically made into a sandwich known as bánh mì kẹp or bánh mì Sài Gòn, eaten alongside dishes such as bò kho (a beef stew) and phá lấu, or dipped in condensed milk (see Sữa Ông Thọ). In the Western Hemisphere, especially in areas with substantial Vietnamese expatriate communities, the term bánh mì is used as a synecdoche for the sandwich, which is sold in Vietnamese bakeries.

This recipe hit my inbox about a week ago from our good friends over at Amazingribs.com. When I saw it, I said to Heather, this is a MUST DO and a MUST BLOG type of dish. Well, I wasn’t far off!

Here’s what you’ll need to make a simple but killer dish for your family and friends.

The protein:

  • 1.5 kg pork belly, skin removed and sliced into 1.5″ cubes

The rub:

  • 1 teaspoon five spice powder
  • 1 teaspoon ginger powder
  • 2 tablespoon brown sugar
  • 2 teaspoon Kosher salt
  • 1 teaspoon ground black pepper

Quick Pickled Vegetables

  • 1/4 cup unseasoned rice wine vinegar
  • 1/4 cup water
  • 1/4 teaspoon Kosher salt
  • 3 tablespoon white sugar
  • 1/2 cup radishes cut into matchsticks
  • 1/2 cup carrots, peeled and cut into matchsticks
  • 1/2 red onion, thinly sliced

Special sauce:

  • 1/2 cup mayonnaise
  • 1/4 teaspoon sesame oil
  • 1/4 teaspoon soy sauce

The glaze:

  • 1/3 cup high quality honey
  • 1 tablespoon light soy sauce
  • 1 tablespoon rice wine vinegar
  • 1/2 teaspoon hot sauce (pick your favourite one)

The bread and garnish

  • 24″ baguette cut into 6″ lengths
  • 2 thin sliced green jalapeno peppers
  • 1/4 cup cilantro – chopped
  • 6″ of thinly sliced cucumber
  • 1/2 cup shredded cabbage

Start by trimming off all the skin from your pork belly. I got mine at NTUC Fair Price in Boon Lay and it was about $4.90 for a packet of 4-5 slices. Save the skin and fry it up later to make some pork crackling…goes great with a cold beer on a hot day.

Once you’ve taken the skin off, trim the pieces to make 1.5″ cubes, If you’re dealing with a whole belly, take a sharp knife and carefully cube it all up.

Mix the rub together and coat your pork belly cubes liberally. You don’t need to oil them but do get them a bit wet with a bit of water. The rub will stick better. Once coated, place the cubes onto a rack and get them ready for smoking.

Set up your smoker (or grill) for indirect heat at 225F (about 107C). Just before you’re ready to smoke, chuck on about two fist-fulls of wood. I used plumb this time around and it’s subtlety was amazing!

Now place your pork belly onto the smoker and set your timer for an hour. Once it pings, simply rotate the rack and let it smoke for one more hour. In the meantime you can prepare your sauce and put it in the fridge. You can also make the glaze and leave that covered at room temperature.

The quick pickled vegetables are super simple to make and taste amazing with the pork belly burnt ends. Simply julienne the carrot and radish and thinly slice up the red onion. In a medium pan, bring the water, vinegar, salt and sugar to a boil. Once done, take it off the heat and place the vegetables into the pot, cover it and let it steep for 30 minutes. Let it cool and transfer the veg to a bowl and refrigerate.

So, two hours have gone by now. Carefully remove the rack containing all the pork belly cubes and transfer them to a dutch oven or a aluminium tray. I love to use my cast iron gear when I can and I prefer it to wasting alumimium trays. Pour the glaze all over the pork belly cubes and make sure you coat them thoroughly. Give them a good stir. I then put an extra two layers of aluminium foil over the dutch oven followed by the lid. Let that steep for 90 minutes.

So now the pork belly cubes are starting to look more like burnt ends. One last step but it’s a tricky one is to crisp up the cubes. Take the dutch oven off the grill and set up for direct heat but use grill grates if you have them. They are essential when doing work like this because you’ll never lose a piece of belly to the roaring flames below.  Trust me, you want every scrap of pork.

Remove the cubes from the dutch oven but keep all that amazing glaze in there. You’ll drop the cubes back in once they’re crispy. Once you’ve got a hot grill ready, place the cubes on top and keep the dome of your grill open. Move the cubes around for about 15 minutes ensuring you don’t burn them. All that hard work could easily go to waste if you’re not careful here.

Once crispy, put the cubes back into the glaze and give them a final coating. Slice your baguette lengthwise leaving a hinge. Smear the mayo-sauce then load of some shredded cabbage, cucumber slices and the pickled vegetables. Now load up your pork belly burnt ends and sprinkle with chopped cilantro and jalapeno peppers.

Prepare to be amazed! Bite into that sandwich and you’ll experience and explosion of flavour that has no equal. Enjoy this great recipe and please let me know how you get on with it.

This slideshow requires JavaScript.

Overall Heather Rating: 11/10

Pork Rib Yakitori


IMG_0593
The Imperial Kamado (The Real Deal)

Hi there fans. Back in June I received a great birthday gift, a copy of Meathead Goldwyn’s book called “The Science of Great Barbecue and Grilling.” I’ve been a big fan of his for years and have recreated some of his signature recipes on this blog.

Now, I’ve read the book from start to finish and over the past weekend I decided it was time to try out a recipe that had piqued my curiosity for a while. In the book the recipe is called “Happy Mouth Yakitori Ribs” and I must admit, it didn’t disappoint! I’ve not found the recipe online as yet so you’ll need to purchase the book (to be fair to my pal Meathead too!) That said, I’ve taken a few minor liberties with this recipe that I’m sure you’ll enjoy.

The approach is pretty unconventional to say the least. With this recipe, we move away from traditional ‘low and slow’ cooking for up to 6 hours and shave that down to about 2 hours in total. The preparation also makes a regular rib cook a bit nervous as well. But, if you follow my interpretation of the recipe, you’ll wow your pals, neighbours and family with this Japanese take on pork ribs.

The prep:

Prepare three slabs of St. Louis cut ribs by removing the silver skin from the bone side of the ribs. Start by lifting a bit off the bone with a butter knife then grab some paper towel (kitchen roll) and grab the flap and pull the membrane off completely.

Now, cut the ribs into individual pieces ensuring that you’ve got an equal amount of meat on either side of the bone. Normally we’d cook the entire slab of ribs but by cutting them into individual pieces you cut the cooking time exponentially and you’ll get each rib to look and taste amazing.

Traditional Yakitori uses chicken meat (from the thigh or gizzard or just about any part really) and there is no marinade used whatsoever. You rely purely on the sauce that you’ll make. For the ribs, I went with a a light dusting of salt and pepper a few hours before I was ready to cook the ribs. Seasoning the ribs helps a lot with the flavour but remember go easy, you don’t need to coat them like you would if you were smoking traditional KC style ribs.

The Yakitori Sauce:

Put the ribs back into the fridge and get ready to prepare the Yakitori sauce. For that you’ll need the following ingredients:

  • 1/2 cup soy sauce
  • 1/2 cup sake
  • 1/2 cup pure orange juice
  • 1/4 cup caster sugar
  • 1/4 cup freshly grated old ginger (and all the juices that you squeeze out)
  • 3 tbsp quality honey
  • 2 tbsp toasted sesame oil
  • 1 tbsp hot sauce of your choice
  • 5-7 small garlic cloves, crushed
  • 1.5 tsp corn starch

Combine the above ingredients except for the cornstarch in a medium sauce pan. Let it simmer and combine for about 30 minutes on a low/medium heat. When your timer pings, remove the saucepan from the heat and strain the liquid through a fine sieve. Squeeze out all the juice from the solids through the sieve so you’re left with nothing but liquid. Put that sauce pan back onto your burner at a low heat. The smell and taste at this point is crazy!

Now, it’s time to thicken up your Yakitori sauce by mixing the corn starch with 2 tbsp of cold water. Mix it up with a fork and then add it to your sauce pan. Stir it around well and you’ll see the magic start to happen. The sauce goes a bit cloudy but will soon change viscosity to resemble something akin to motor oil.  From this point, let the sauce simmer for another 15 minutes then set it aside.

The Roasting

Set your grill up for indirect heat and stabilise your temperature at 225F (107C). You don’t want to add any smoke as it’ll clash with the sauce. I used a two tier grid and the Imperial Kamado I restored last year. Seemed fitting to use a Japanese kamado for a Japanese inspired dish.

Let the ribs roast for about 90 minutes. They’ll turn a beautiful golden brown colour. Take them off and place them into a metal bowl that’s deep enough for you to coat all the ribs with the sauce. Carefully pour your Yakitori sauce all over the ribs and toss them around so you get an even coating on all sides of the ribs.

Return the ribs to the grill and let them roast for another 20 minutes or so at 225F (107C). Once the sauce has baked on to the ribs, remove them and plate them up. I added toasted sesame seeds and some finely cut chives for good measure, great taste and a beautiful look. Now these ribs aren’t the type that slide off the bone. They take a bit of effort but as you’ll see in the pictures, all the meat comes off with a few simple bites. I like to work for by ribs!

All in all, an amazing new twist on pork ribs! Thanks Meathead and to the team at Amazing Ribs!

The family loved them and the neighbour’s kids devoured the few leftover ribs that we had.

This slideshow requires JavaScript.


Overall Heather Rating: 10/10


3-2-1 Competition Worthy Pork Ribs


IMG_8385

Hi folks. It’s been a long, long time since I’ve sat down to enter a blog entry. I must admit, it’s just easier to post on FaceBook but then, we’re not all friends on FaceBook are we?

I’ve picked a few recipes to share just for fun. The first of which are these fine St. Louis style competition worth pork ribs.

Here’s what you’ll need:

  • A pair of St. Louis style pork rib racks (we get ours at The Warehouse Club in Jurong for less than $10/rack!)
  • A bit of regular yellow mustard
  • “Memphis Dust” rib rub
    • 3/4 cup firmly packed dark brown sugar
    • 3/4 cup white sugar
    • 1/2 cup paprika
    • 1/4 cup garlic powder
    • 2 tablespoons ground black pepper
    • 2 tablespoons ground ginger powder
    • 2 tablespoons onion powder
    • 2 teaspoons rosemary powder
  • A few knobs of unsalted butter
  • Brown sugar
  • A tiny splash of apple juice
  • A good slathering of Competition Red Sauce (a la Big Bob Gibson’s recipe):
    • 1 1/4 cups (12.5 oz/355 g) ketchup
    • 1 cup water (8 oz/235 g) water
    • 3/4 cup (6 oz/170 g) vinegar
    • 3/4 cup (6 oz/170 g) tomato paste
    • 3/4 cup (4.5 oz/135 g) brown sugar
    • 2/3 cup (7.75 oz/220 g) corn syrup
    • 1/2 cup (4 oz/ 170 g) pure maple syrup
    • 4 tbsps (1.5 oz/100 g) honey
    • 3 tbsps (2.25 oz/60 g) molasses
    • 4 tsps (25 g) salt
    • 4 tsps (.75 oz/20 g) Worcestershire sauce
    • 1 tbsp (.75 oz/25 g) applesauce
    • 1 1/2 tsps (.25 oz/8 g) soy sauce
    • 1 1/2 tsps (.25 oz/5 g) liquid smoke
    • 1 tsp (4 g) onion powder
    • 3/4 tsp (2 g) cornstarch
    • 1/2 tsp (1 g) dried mustard powder
    • 1/2 tsp (1 g) cayenne powder
    • 1/2 tsp (1 g) black pepper
    • 1/8 tsp garlic powder
    • 1/8 tsp white pepper
    • 1/8 tsp celery seed
    • 1/8 tsp ground cumin

Prep is really simple. Wash off your ribs and pat them dry with some kitchen roll. Remove the membrane on the bone side of the ribs by prying it loose then tearing it off using a bit of kitchen roll. It really helps with the grip.

Then slather a bit of mustard on both sides of the rib racks. Some people omit this step, others swear by it. Me, I’m easy either way. The mustard, being a water-based product simply lets the rub adhere to the rack a bit better. Water works just as well to be honest as you’ll really not taste the mustard once you’re done.

Next you’ll coat your ribs liberally (like a Bernie Sanders) making sure that you’ve covered every centimetre. That will help with the bark and ensure that no matter where you bite down on that rib, you’ll get a good helping of the rub/crust.

Set up your smoker/grill for indirect heat and stabilise it at 225F (107C). Add in some wood chunks to get the smoke going. For this cook I used Beech wood. Nice and delicate.

Once you get that blue stream of smoke going, it’s time to put the ribs on. I placed a drip pan full of hot water under the ribs (and on top of the plate setter) to add some additional humidity inside the Big Green Egg. Living in Singapore, you really don’t need that.

Place your ribs down meat side up and set your timer for 3 hours. Go grab a beer, read a book, mow the lawn. You’ve got time.

When your timer pings, take the ribs back into the kitchen. Grab some heavy duty aluminium foil large enough to tightly wrap the ribs. Before you place the ribs down, sprinkle a healthy amount of brown sugar. Add three knobs of butter and a bit of honey drizzled. Place the ribs down, meat side down. Sprinkle some brown sugar, add some butter and honey onto the bone side. Now make a packet, add a splash of apple juice and crimp it all so that you’ve made an airtight seal. If the bones tear through, just use another piece of  foil.

Back onto the grill, meat side down for another 90 minutes to 2 hours. I took mine off a bit early because I didn’t want them to fall right off the bone. Now, add a bit more rub and slather with a good coat of Red Sauce. Place it back onto the grill for another 30 -60 minutes. Again, I did 30 as I didn’t want ribs over done. With practice, you’ll get the hang of the timing.

The last step is to get some flame going and char up the meat side of the ribs. I use Grill Grates and swear by them. Get the grid nice and hot and sear the ribs until you get some nice caramelisation happening.

Once ready, pull off the ribs and let them rest for at least 10 minutes. Then cut between the bones and serve.

My family loves this recipe and as I’m writing this, I’ve got two racks on the go just now.

Enjoy!

This slideshow requires JavaScript.

Overall Heather Rating: 10/10


Ultimate Ribs


_MG_3691If you’re looking for the Ultimate rib recipe, look no further…ladies and gents here it is. This is a variant on a few different recipes I’ve researched, pulling together what Heather thinks are the BEST ribs ever on the Big Green Asian Egg. So here’s what you’ll need to do!

Let’s start with preparing the rub. Many BBQ cooks keep their rub recipes a secret. That’s just plain silly in my opinion unless of course you’re competing in a competition or running your own restaurant. If you don’t share, the rest of us can’t get better at the craft.

Rub – Stage 1

  • 2 tsp whole black peppercorns
  • 2 tsp whole mustard seeds
  • 1 tsp cumin seeds
  • 1 tsp celery seeds

Take the spices above and toast them in a small dry skillet over medium heat. You’ll know when it’s done when you get this amazing waft of spice filling your kitchen. It takes about 3-4 minutes in all. Remove the spices and let them cool a bit before transferring to a spice grinder.

Rub – Stage 2

Now add the following to the spice grinder and pulverise it to a nice fine grit.

  • 3 tbsp paprika (smoked would be awesome too!)
  • 2 tbsp brown sugar
  • 2 tsp pure sea salt
  • 1.5 tsp garlic powder
  • 1/2 tsp chili powder

Grind it all up and set it aside… your ultimate rib rub is now done.

Let’s move to the sauce next. In a large saucepan add the following ingredients:

  • 1 can of high octane Coca-Cola (the regular stuff in the red can)
  • 1 cup Heinz ketchup
  • 1/4 cup Apple cider vinegar
  • 3 tbsp molasses
  • 2 tbsp pure Canadian maple syrop
  • 2 tbsp ultimate rib rub (yes, the stuff you just made!)

Bring the sauce to a boil and then reduce the heat to low and let the sauce simmer (uncovered) for about 25 minutes. It’ll thicken up before you know it and it’ll go a gorgeous deep reddish brown colour. Let the sauce cool and then transfer it to an airtight jar. The sauce is good for 3 months however I’ve never ever seen enough to last more than a few weeks in this house!

Right, so now you’re done the necessary prep. Let’s get the ribs sorted next.

I purchased two slabs of frozen St Louis cut ribs from the local Singapore equivalent of Costco, The Warehouse Club. They were $9/slab and easily twice the size of the ribs I normally get from our friends at QB. Frozen ribs are fine by the way, though I do like to go to the wet market and occasionally buy fresh chilled pork, but that’s really for special occasions.

Thaw your ribs a few hours ahead of time, rinse them under cold water and then pat them dry on your cutting board. Some people insist on removing the silver skin. I don’t bother as it hardly makes a difference. Take a bit of vegetable oil and coat both sides of the slab. Now take your rub and give both the top and bottom a good liberal coating. Don’t forget to get the sides ensuring you get some rub between the bones. Now take each slab and wrap them tightly in some heavy duty aluminium foil. Try to make an airtight packet so that the juices don’t run out. Now place them in the fridge for a few hours. The longer the better. If you’re pressed for time, that’s ok too but I like to let the meat try and absorb the rub as much as possible.

Set up your grill for indirect heat with a drip pan full of hot water. Even though the ribs are protected in the foil, you want to ensure you’ve got a nice humid environment under the hood. Stabilise your temperature at a medium heat around 325F (163C). Put the ribs on a rack above your water pan, close the lid and let it rip for 2 hours.

Once your timer pings, carefully remove the packets from the grid, set them aside and now fire up the grill to get it as hot as it can. Carefully cut a corner off the packets and drip any of the juices that have remained into a pyrex measuring cup. Unwrap your ribs and get them onto the hot grid. Timing isn’t that critical here so you don’t have to rush. Put the ribs meat-side up and paint them with the sauce you made a few hours earlier. Make sure your sauce isn’t cold, right out of the fridge. I keep it handy at room temperature as I baste any meat. After about two minutes, carefully flip the slabs and paint the bottom side of the ribs. Keep flipping every two minutes or so to get a wonderful caramelisation across the ribs. Crisp them up carefully with the lid open and for the love of God, don’t walk away, the ribs can burn quite easily.

Remove the ribs when they’re nice and crispy and serve the slabs whole. Let your guests take as much or as little as they like. We served the ribs with an amazing ratatouille incorporating roasted red pepper, tomato, onion, garlic, Italian herbs, feta, parmesan and mozzarella cheese.

If you check out the photos, you’ll clearly see that the family LOVED these ribs. In fact, my darling bride Heather proclaimed quite categorically, these were the BEST ribs we’ve ever had. Naturally, I took a bow and immediately wanted to share this recipe with the world. Let us know how it goes!

This slideshow requires JavaScript.

Overall Heather Rating: 10/10

Low ‘n Slow Pork Chops


That's one monster chopA quick post for a Monday night. As if weren’t enough that we ate our faces off over the weekend, I had 4 pork chops in the fridge that needed to be sorted out. What better way than to use a tried and tested method of “reverse searing” and come up with an amazing dish?

When you’re ready to prep, take your chops out of the fridge, give them a rinse under cold water and pat them dry. Drizzle a bit of vegetable oil on the chops and sprinkle a good helping of your favourite rub. Last night I used a pre-made rub (I know, I know…I just couldn’t be asked to make my own!) The rub I used was Cape Herb & Spice, Smoky BBQ Braai seasoning. Braai is the South African style of grilling and I suppose this spice was meant to reflect a typical Braai rub which included brown sugar, coriander, paprika, black pepper and something quite dodgy called “flavour.”  Give it a good coating and pop it back in the fridge until you’re ready to grill.

Set up your grill for indirect heat and stabilise at 225F (107C). When ready, place your chops on the grid and make sure you’ve got a good probe thermometer to track your progress. I had a few chops that were different in size and thickness so to be extra sure, I used my Thermapen which gives you lightning fast readings without you losing too much knuckle hair.

Flip your chops ever 15 minutes or so until they all reach about 125F (52C) then pull them off and tent them with some aluminium foil. Now the fun part….

Remove the plate setter or simply turn up the grill to maximum temperature. I removed the plate setter and inserted my trusty “Grill Grates” to get that extra special sear! When you hit “stupid hot” paint your pork with your favourite sauce and place the chops on the grid. 2 minutes later, give them a quick 45 degree spin for another two minutes. Now flip and do the same thing adding a bit more sauce. Grill for 2 minutes, 45 degree turn and then grill for another 2 minutes. Check your temperature with a probe thermometer as you’re finishing the sear. Note that you should remove your wired probe when you’re searing. The heat off the grid will render your probe absolutely “kaput!” This is where a thermapen comes in really handy.

Pull the chops off at 143F (62C) and let them rest for about 5 minutes under a lose tent of aluminium foil.

We served up these chops with some garlic fried rice and cheesy broccoli. Absolutely easy and absolutely tasty!

This slideshow requires JavaScript.

Overall Heather Rating: 8/10 (her personal preference, not the recipe…so she says!)

That’s one monster chop

Char Siew (Ribs) – 叉燒


_MG_0027Once in a while you’ll come across a recipe that will blow your noodle and definitely make your top five list of the most amazing thing you’ve ever eaten. Last Sunday, just such a recipe made our list on the Big Green Asian Egg blog! We were really happy to use our good pal James Watkins as our guinea pig…. thanks Jimmy boy!

Char Siew Ribs, (pronounced Cha-Siew, drop the R sound) is a staple here in the tropical paradise we love to call home, Singapore. I adapted Meathead Goldwyn’s Amazing Ribs recipe to test out the authenticity and flavour profile of one of my favourite foods. I was amazed on both fronts! The great thing is that you can also make these ribs indoors in an oven if you don’t have the ability to grill outside.

In Singapore, you’ll see Char Siew hanging in most hawker stall windows. They tend to use the pork collar instead of ribs. The collars are loaded with fatty tissue that melts when slowly roasted. The flavour is intoxicating and you’ll line up for more! You can get a plate full of this delicious pork with steamed rice and veggies or my favourite, won ton noodles and broth with a healthy dollop of chili sauce. Needless to say, if you’ve ever been through Singapore, this is a dish you’ve got to try. My local hawker centre sells the above mentioned for $3.50 (SGD) or $2.60 (USD), a bargain if you’re on a budget!

So the ingredients list for the marinade goes a bit like this:

  • 1/2 cup hoisin sauce
  • 1/2 cup vodka (or rum or brandy or even red wine)
  • 1/4 cup quality honey
  • 1/4 cup light soy sauce
  • 2 tablespoons toasted sesame oil
  • 2 tablespoons hot sauce of your choice
  • 2 tablespoons powdered ginger
  • 2 tablespoons powdered onion
  • 1 tablespoon powdered garlic
  • 1 tablespoon five spice powder
  • 1 teaspoon red food colouring

Mix all of the above in a metal bowl (as you may run the risk of staining a plastic bowl with that red food colouring) and set it aside. Let it sit for about an hour in the fridge and when you’re ready to pour it over the ribs, give it a good whisk!

I used three racks of baby back ribs and cut them into individual ribs. Not something I normally do but for this recipe, you want each rib to be fully coated with that lovely marinade! When ready, place your ribs into a heavy duty zip-top bag, add the marinade and give the bag a good massage, trying to get as much air out of it as possible.  Be mindful not to puncture the bag with the bone ends and so just to be careful, place your bag into a bowl that can catch any of the marinade should it escape. I marinated these ribs for roughly 30 hours, occasionally turning the bag and giving it a bit of a squeeze as and when I was in the fridge.

Like I said, you can do these ribs indoors but since this is a blog about the Big Green Asian Egg, there was no way I was going to use the thing we call an oven. That’s where pavlovas are made!

Set up your grill for 2-zone or indirect cooking, easily achieved with a BGE plate setter. Don’t add any wood chips as you want to minimise the smoke here. Stabilise your temperature at 225F (1017C) and hold it there using an ambient temperature probe. For these ribs, you’ll be cooking to time and not temperature so it’s really important you keep your ambient temperature just right. I also set up a multi-tiered grid that sat over a drip pan full of hot water. The grid was amazing for this set up and highly recommended to produce a high yield of rib goodness!

Place the ribs meat side up and make sure you space them out, not touching each other. Close the dome and set your watch for 2 hours. Once there, have a quick peek, spin the grid to ensure even cooking and have a good look at the ribs. They should look like they’ve got a nice char starting to form and they’ll sweat a bit, showing you how juicy and moist they are. At 2.5 hours, remove the ribs and place them into a big metal bowl. Grab about a 1/3 cup of quality honey, zap it in the nuker for about 30 seconds then coat the ribs. Toss the bowl around, ensuring you’ve coated all the ribs. This provides a wonderful glaze and an eye popping flavour that gives these ribs and almost  bak kwa taste! (Bak Kwa is by far the BEST pork dish ever… dare I say even an improvement on bacon!!!!)

Place the ribs back on the grid and roast them for another 15 minutes or so. These baby back ribs were pretty thin so I adjusted the roasting time from 3 hours in total to 2.45. When finally done, place the sticky ribs back in the big metal bowl, sprinkle some toasted sesame seeds (and please do toast them as you’ll release all the wonderful sesame flavour by doing this…just be careful not to burn them as that’s fairly easily done) and finely chopped green onion or chives. Toss the bowl around and get ready to serve.

Our ribs were served with a wonderful soba noodle salad with a sesame and ginger dressing. A bit of Cantonese meets Japanese fusion to be honest. The result was AMAZING!  Thanks Meathead and team at Amazing Ribs for the inspiration!

This slideshow requires JavaScript.

Overall Heather Rating: 10/10

Lechon – Villaba Style!


_MG_6727

Now I’ve had my fair share of pork during my 42 years on this planet but NONE has even come close to the Lechon that was prepared for us by the Lucero family in Villaba, Leyte, Philippines! The post’s photos may be a bit much for those that have never seen “Porky” go from wallowing in it’s own filth to the plate, but it must be said, from the word “Go” the process was respectful above all to the wonderful animal that gave it’s life to fill the tummies of nearly 100 people.

We were blessed to visit a very rural part of Philippines this past year and we got way more than we bargained for. From meeting the most wonderful family, the Lucero’s, to surviving a Category 4 Super-typhoon called “Ruby” (and just about everything in between!) One of the most memorable and delectable parts of our visit was the lechon that was prepared for us. The pig, “Porky” weighed in at a massive 68kg (150 lbs) and well, let’s just say it was the largest pig I’ve ever had the pleasure to help devour.

It started at 4:00 am with a very quick and respectful dispatch. It took about 7 grown men to accomplish the task but once done, the crew got to work. They had boiled a few pots of water to help blanche the skin in order to remove all of the top few layers of the dermis. By the time they were finished the carcass was as smooth as silk. She was gutted and nothing had gone to waste. You see, in this part of the world every piece counts and it really helped me realise how lucky we are when we see our pre-packaged meat at the butcher’s counter!

The cavity was then prepped with a variety of spices along with a large number of lemon-grass stalks. She was sewn up with a copper hook and twine and then rotated, by hand, for just over 4 hours. The fire set up was crucial. They basically built two large fires with hard wood about 2 meters across. The pig was spun in between ensuring that it was getting even heat from both sides throughout the roast. It was bloody hot outside as it was and I’ve got nothing but respect for the lads that sat there hour after hour spinning “Porky” to a wonderful end, poking any blisters so that it rendered out some of the fat, keeping the crackling intact!

We were ready to eat at about 3PM. The result was insane! I’ve never had crackling like that before and the pork was as tender as could be with bursts of spice and lemon grass throughout. Did I mention that the crackling was the BEST I’ve ever had? I still dream of it on hungry nights. The lechon fed the entire village and then some. What wasn’t eaten then and there was packaged up in small plastic bags to be distributed to the less fortunate in the village. Again, food for thought!

I wanted to post this story because THIS is what true barbecue is! Its about respect, its about knowledge, its about taste and it’s about love! We were so grateful to Chef “Lito” and his band of merry men for sharing with us the most incredible meal ever! Salamat!

This slideshow requires JavaScript.

Overall Roman/Heather Rating: 100/100

New Year – More Food


_MG_8893


Hi everyone, it has been a while since I’ve sat down to “pen” a quick note. I wanted to reflect over the past year and thank everyone who’s stopped in, made a comment or was inspired to try one of our recipes.

I simply want to wish all of you a healthy, safe and fantastic 2015. May it bring new recipes, less bloating and lots of laughter mixed in with a little adventure. So, here are a few photos from our annual New Years Eve party. We hosted over 40 people with the legendary and traditional pulled pork (a 16.3 pound/7.4 kg beast that took 33.4 hours!) A special thanks to Heather, the kids and Yaya for the inspiration and the clean up!  Cheers!

Enjoy!

This slideshow requires JavaScript.


“Pavlova” with French Cut Pork Loin


_MG_2665Can I get a “woot woot?” Sunday roast dinner with Ben Lock, Fifi Marée and little man Destin proved absolutely fantastic! A new recipe on the Big Green Egg: a herb encrusted French cut bone in pork loin. This recipe took a bit of preparation so if you do have two days in advance, I’d recommend you do give this a try! You’ll need a 1.6 kg bone in pork roast to start and a few other ingredients to make the magic happen!

The day before you roast this pork you’ll need to brine it overnight. Simply add the following ingredients in a non-reactive bowl:

  • 4 Cups pure apple juice (not the “drink” stuff!)
  • Slightly less than a quarter cup of salt (use the cheap stuff and Kosher salt is too good for a brine!)
  • 1/2 cup of fresh minced garlic.
  • Some freshly cracked black pepper – about 15 turns should do.

Whisk this all up and then add your pork roast to a zip-top bag, add the brine to the bag and put it in a non-reactive bowl in the fridge overnight. The bowl helps as in my case, the bag split at some point and the pork was still fully submerged!

The morning of the roast, take your pork out of the bag, give it a bit of rinse under cold water and pat it dry with a paper towel. Set it aside and get ready to prep the marinade and the garlic into the roast. Here’s what you’ll need:

  • 2 cloves of garlic, thinly sliced (to insert into your roast)
  • Your brined pork (of course)
  • 2 tbsp of freshly minced ginger
  • 2 tbsp of freshly minced garlic (yes, more garlic!)
  • 3 tbsp of minced shallots
  • 2 tbsp fresh thyme leaves removed from their stalks
  • 2 tbsp fresh sage
  • 2 tbsp fresh rosemary leaves, also removed from their stalks
  • 3.4 cup of quality olive oil
  • Kosher salt and freshly cracked black pepper to taste

First, take a small sharp knife and pierce the roast about 4cm deep all around the roast. Add a sliver of garlic into each one of the incisions you make. Next, truss your roast with some butchers twine. This ensures that the roast will cook evenly and it presents really nicely as a result. Once done, move to the marinade. Combine all of the ingredients listed above in a blender. Pulse about 10 times until you get a really nice paste. If it looks too dry, add a bit more olive oil. Once done, give it a taste and add only a bit of salt as the brine as already done a lot of the salting for you. Put the roast into a clean zip-top bag, add the marinade and give it a bit of a massage. Make sure you coat the entire roast evenly. Now pop it back in the fridge until roasting time.

For your grill set up you’ll need to get the temperature stable at about 325F (163C), indirect heat.  Get a drip pan filled with warm water and add a small bit of wood. In my case I used cherry wood, but only a little bit to add a hint of smoke to an otherwise delicate meat. Let the smoke turn from white to a very light blue and then get ready to roast! Get a rack over the drip pan, insert your thermometer into your roast and shut the dome. No peeking until the internal temperature hits 140F (60C). That should take about 90 minutes for a roast this size.

Once you reach your internal temperature, remove the rack and tent it with some aluminium foil for about 10 minutes. When ready, remove the butcher’s twine first and then cut the roast into even chops between the bone. Serve with some roasted vegetables and a side salad and you’re done!

As usual the meal was delicious but again I was trumped by Heather’s homemade Pavlova! I’m not sure she’s willing to share her recipe but let me tell you, it was one of the BEST desserts she’s ever made. Full marks for the Pav babycakes!

_MG_2669All in all, a wonderful night with great company and amazing food!

Overall Heather Rating: 10/10

Overall Pavlova Rating: OFF THE CHARTS!


This slideshow requires JavaScript.