Tag Archives: Ribs

9 Hour Cherry Smoked Beef Short Ribs


IMG_9625Hi fans, here’s a great recipe we shared with good friends a few weeks back. This cut of beef, the short rib, has to be one of my favourites to eat. Once smoked between 8-10 hours, this meat literally drops from the bone and it’s juicy, flavourful and absolutely amazing to devour.

The ribs were procured from our friend Andy at New Zealand Fresh and came in four packs with four ribs per pack. The first thing you’ll want to do is slowly defrost them in the fridge over night. No sense ruining the cut with a fast and furious defrost. Once done, you’ll want trim the excess fat cap off each of the racks. There’s enough to render into some fantastic beef tallow too! Finally, you’ll want to dry brine the rib racks with some Kosher salt and let them sit overnight in the fridge.


IMG_9579
trimming the fat

The morning of the meal you’ll want to prepare your rub. Here’s Meathead’s Big Bad Beef Rub (slightly adjusted accounting for less pepper.)

  • 1.5 tablespoons coarsely ground black pepper
  • 1 tablespoon granulated white sugar
  • 1 tablespoon onion powder
  • 2 teaspoons mustard powder
  • 2 teaspoons garlic powder
  • 2 teaspoons chili powder
  • 1 teaspoon chipotle or cayenne powder

When you’re ready, cut the rib racks into 2-rib sections. Wet the ribs with plain tap water and then apply the rub EVERYWHERE! Set up your smoker for indirect heat and stabilise it at 225F (107C). I added a bit of cherry wood for smoke as a mesquite would be too powerful. You want the ribs to really stand out here. Too much smoke or the wrong type can really spoil this dish.

I used a two tier rack and placed a drip pan full of beef stock underneath the ribs. You want to catch all that lovely juice as it renders from the ribs. Gravy, baked beans, soup…you name, you can use it.

Place the ribs bone side down and insert a reliable thermometer probe into one of the thickest cuts. Make sure you’re not touching bone here or else you’ll get an inaccurate reading.

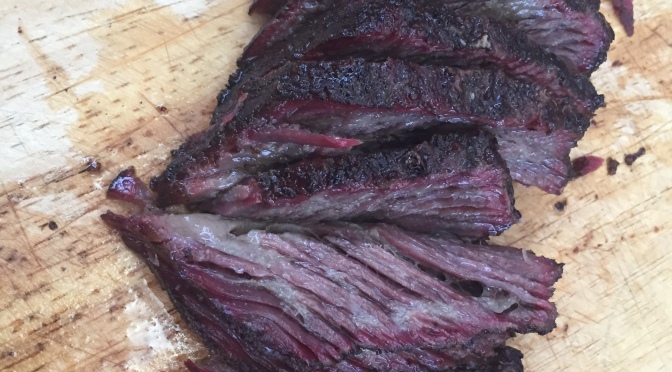
Let the smoking begin. Your target internal temperature will be just like a big beef brisket… the magic number of 203F (95C.) These ribs took just over 9 hours and were worth every minute of waiting time. Once you hit the magic temperature, remove them gently as the meat will literally slide off the bone. Let them rest for a bit because they’re hot…I mean nuclear hot. Then, skilfully slice the ribs off the bone and carve on an angle. Notice the smoke ring that forms after 9 hours!  Gorgeous!

Serve em up with some of Roman’s “Fart Soup” (a recipe for another day) and call some good friends over.

This slideshow requires JavaScript.

Overall Heather Rating: 10/10 

3-2-1 Competition Worthy Pork Ribs


IMG_8385

Hi folks. It’s been a long, long time since I’ve sat down to enter a blog entry. I must admit, it’s just easier to post on FaceBook but then, we’re not all friends on FaceBook are we?

I’ve picked a few recipes to share just for fun. The first of which are these fine St. Louis style competition worth pork ribs.

Here’s what you’ll need:

  • A pair of St. Louis style pork rib racks (we get ours at The Warehouse Club in Jurong for less than $10/rack!)
  • A bit of regular yellow mustard
  • “Memphis Dust” rib rub
    • 3/4 cup firmly packed dark brown sugar
    • 3/4 cup white sugar
    • 1/2 cup paprika
    • 1/4 cup garlic powder
    • 2 tablespoons ground black pepper
    • 2 tablespoons ground ginger powder
    • 2 tablespoons onion powder
    • 2 teaspoons rosemary powder
  • A few knobs of unsalted butter
  • Brown sugar
  • A tiny splash of apple juice
  • A good slathering of Competition Red Sauce (a la Big Bob Gibson’s recipe):
    • 1 1/4 cups (12.5 oz/355 g) ketchup
    • 1 cup water (8 oz/235 g) water
    • 3/4 cup (6 oz/170 g) vinegar
    • 3/4 cup (6 oz/170 g) tomato paste
    • 3/4 cup (4.5 oz/135 g) brown sugar
    • 2/3 cup (7.75 oz/220 g) corn syrup
    • 1/2 cup (4 oz/ 170 g) pure maple syrup
    • 4 tbsps (1.5 oz/100 g) honey
    • 3 tbsps (2.25 oz/60 g) molasses
    • 4 tsps (25 g) salt
    • 4 tsps (.75 oz/20 g) Worcestershire sauce
    • 1 tbsp (.75 oz/25 g) applesauce
    • 1 1/2 tsps (.25 oz/8 g) soy sauce
    • 1 1/2 tsps (.25 oz/5 g) liquid smoke
    • 1 tsp (4 g) onion powder
    • 3/4 tsp (2 g) cornstarch
    • 1/2 tsp (1 g) dried mustard powder
    • 1/2 tsp (1 g) cayenne powder
    • 1/2 tsp (1 g) black pepper
    • 1/8 tsp garlic powder
    • 1/8 tsp white pepper
    • 1/8 tsp celery seed
    • 1/8 tsp ground cumin

Prep is really simple. Wash off your ribs and pat them dry with some kitchen roll. Remove the membrane on the bone side of the ribs by prying it loose then tearing it off using a bit of kitchen roll. It really helps with the grip.

Then slather a bit of mustard on both sides of the rib racks. Some people omit this step, others swear by it. Me, I’m easy either way. The mustard, being a water-based product simply lets the rub adhere to the rack a bit better. Water works just as well to be honest as you’ll really not taste the mustard once you’re done.

Next you’ll coat your ribs liberally (like a Bernie Sanders) making sure that you’ve covered every centimetre. That will help with the bark and ensure that no matter where you bite down on that rib, you’ll get a good helping of the rub/crust.

Set up your smoker/grill for indirect heat and stabilise it at 225F (107C). Add in some wood chunks to get the smoke going. For this cook I used Beech wood. Nice and delicate.

Once you get that blue stream of smoke going, it’s time to put the ribs on. I placed a drip pan full of hot water under the ribs (and on top of the plate setter) to add some additional humidity inside the Big Green Egg. Living in Singapore, you really don’t need that.

Place your ribs down meat side up and set your timer for 3 hours. Go grab a beer, read a book, mow the lawn. You’ve got time.

When your timer pings, take the ribs back into the kitchen. Grab some heavy duty aluminium foil large enough to tightly wrap the ribs. Before you place the ribs down, sprinkle a healthy amount of brown sugar. Add three knobs of butter and a bit of honey drizzled. Place the ribs down, meat side down. Sprinkle some brown sugar, add some butter and honey onto the bone side. Now make a packet, add a splash of apple juice and crimp it all so that you’ve made an airtight seal. If the bones tear through, just use another piece of  foil.

Back onto the grill, meat side down for another 90 minutes to 2 hours. I took mine off a bit early because I didn’t want them to fall right off the bone. Now, add a bit more rub and slather with a good coat of Red Sauce. Place it back onto the grill for another 30 -60 minutes. Again, I did 30 as I didn’t want ribs over done. With practice, you’ll get the hang of the timing.

The last step is to get some flame going and char up the meat side of the ribs. I use Grill Grates and swear by them. Get the grid nice and hot and sear the ribs until you get some nice caramelisation happening.

Once ready, pull off the ribs and let them rest for at least 10 minutes. Then cut between the bones and serve.

My family loves this recipe and as I’m writing this, I’ve got two racks on the go just now.

Enjoy!

This slideshow requires JavaScript.

Overall Heather Rating: 10/10


Ultimate Ribs


_MG_3691If you’re looking for the Ultimate rib recipe, look no further…ladies and gents here it is. This is a variant on a few different recipes I’ve researched, pulling together what Heather thinks are the BEST ribs ever on the Big Green Asian Egg. So here’s what you’ll need to do!

Let’s start with preparing the rub. Many BBQ cooks keep their rub recipes a secret. That’s just plain silly in my opinion unless of course you’re competing in a competition or running your own restaurant. If you don’t share, the rest of us can’t get better at the craft.

Rub – Stage 1

  • 2 tsp whole black peppercorns
  • 2 tsp whole mustard seeds
  • 1 tsp cumin seeds
  • 1 tsp celery seeds

Take the spices above and toast them in a small dry skillet over medium heat. You’ll know when it’s done when you get this amazing waft of spice filling your kitchen. It takes about 3-4 minutes in all. Remove the spices and let them cool a bit before transferring to a spice grinder.

Rub – Stage 2

Now add the following to the spice grinder and pulverise it to a nice fine grit.

  • 3 tbsp paprika (smoked would be awesome too!)
  • 2 tbsp brown sugar
  • 2 tsp pure sea salt
  • 1.5 tsp garlic powder
  • 1/2 tsp chili powder

Grind it all up and set it aside… your ultimate rib rub is now done.

Let’s move to the sauce next. In a large saucepan add the following ingredients:

  • 1 can of high octane Coca-Cola (the regular stuff in the red can)
  • 1 cup Heinz ketchup
  • 1/4 cup Apple cider vinegar
  • 3 tbsp molasses
  • 2 tbsp pure Canadian maple syrop
  • 2 tbsp ultimate rib rub (yes, the stuff you just made!)

Bring the sauce to a boil and then reduce the heat to low and let the sauce simmer (uncovered) for about 25 minutes. It’ll thicken up before you know it and it’ll go a gorgeous deep reddish brown colour. Let the sauce cool and then transfer it to an airtight jar. The sauce is good for 3 months however I’ve never ever seen enough to last more than a few weeks in this house!

Right, so now you’re done the necessary prep. Let’s get the ribs sorted next.

I purchased two slabs of frozen St Louis cut ribs from the local Singapore equivalent of Costco, The Warehouse Club. They were $9/slab and easily twice the size of the ribs I normally get from our friends at QB. Frozen ribs are fine by the way, though I do like to go to the wet market and occasionally buy fresh chilled pork, but that’s really for special occasions.

Thaw your ribs a few hours ahead of time, rinse them under cold water and then pat them dry on your cutting board. Some people insist on removing the silver skin. I don’t bother as it hardly makes a difference. Take a bit of vegetable oil and coat both sides of the slab. Now take your rub and give both the top and bottom a good liberal coating. Don’t forget to get the sides ensuring you get some rub between the bones. Now take each slab and wrap them tightly in some heavy duty aluminium foil. Try to make an airtight packet so that the juices don’t run out. Now place them in the fridge for a few hours. The longer the better. If you’re pressed for time, that’s ok too but I like to let the meat try and absorb the rub as much as possible.

Set up your grill for indirect heat with a drip pan full of hot water. Even though the ribs are protected in the foil, you want to ensure you’ve got a nice humid environment under the hood. Stabilise your temperature at a medium heat around 325F (163C). Put the ribs on a rack above your water pan, close the lid and let it rip for 2 hours.

Once your timer pings, carefully remove the packets from the grid, set them aside and now fire up the grill to get it as hot as it can. Carefully cut a corner off the packets and drip any of the juices that have remained into a pyrex measuring cup. Unwrap your ribs and get them onto the hot grid. Timing isn’t that critical here so you don’t have to rush. Put the ribs meat-side up and paint them with the sauce you made a few hours earlier. Make sure your sauce isn’t cold, right out of the fridge. I keep it handy at room temperature as I baste any meat. After about two minutes, carefully flip the slabs and paint the bottom side of the ribs. Keep flipping every two minutes or so to get a wonderful caramelisation across the ribs. Crisp them up carefully with the lid open and for the love of God, don’t walk away, the ribs can burn quite easily.

Remove the ribs when they’re nice and crispy and serve the slabs whole. Let your guests take as much or as little as they like. We served the ribs with an amazing ratatouille incorporating roasted red pepper, tomato, onion, garlic, Italian herbs, feta, parmesan and mozzarella cheese.

If you check out the photos, you’ll clearly see that the family LOVED these ribs. In fact, my darling bride Heather proclaimed quite categorically, these were the BEST ribs we’ve ever had. Naturally, I took a bow and immediately wanted to share this recipe with the world. Let us know how it goes!

This slideshow requires JavaScript.

Overall Heather Rating: 10/10

Birthday Ribs for Cynthia!


Good day rib fans!  Well I finally decided it was time to try a new rib recipe – the Fred Flintstone ribs work really, really well and I’ve had nothing but compliments with them but in true Roman-esq fashion, the quest for perfect pork ribs continues.  Last Sunday we hosted Cynthia and Lucy (our regular guests) to an impromptu BBQ, only to find out it was Cynthia’s 26th birthday!  Happy Birthday darling!

Anyway, I digress.  I purchased two slabs of baby back ribs from Hubers over the weekend and I used this method as explained by none other than “Dr.BBQ” and here’s how it goes:

Dr. BBQ’s famous baby back ribs recipe

  • 2 slabs baby back ribs, membrane on back of ribs removed
  • 2 cups honey
  • 1 1/2 cups apple juice
  • 2 cups of Dr. BBQ’s Sweet and Sticky Glaze (see below)
  • Dr. BBQ’s rub (see below)

Prepare your cooker for indirect grilling at 275 degrees Fahrenheit, using cherry and hickory wood for flavor – (we used mesquite chunks – about 4 in total). Season the ribs with the rub. Put the ribs into the smoker, meaty site up for two hours. (this was about an hour too long for my ribs – learning point for next time – NEVER USE ANY OTHER RIBS THAN THOSE OF OUR FRIEND THE PIG LADY…Huber’s ribs are good but way too skinny!) Flip the ribs and cook another hour. Remove the ribs to a platter. (Again, use your gut feel here and you’ll be able to tell when the first stage is done!)

Take a double-thick piece of heavy-duty aluminum foil (big enough to wrap a slab of ribs), and slather about 1/3 cup of honey on each sheet, spreading it where the ribs will lie. Place the ribs meaty side down and add more honey on top of the slab. Now crimp the edges of the foil and pour 1/2 cup of apple juice in the bottom. Do this for all three slabs. Loosely close the packets around the ribs and lay them back in the cooker.

Cook another 90 minutes. Carefully unwrap the packets and take out the ribs. Place the ribs back on the cooker, raising the temperature to 350 degrees. Brush with the glaze or barbecue sauce and flip several times for another 20 minutes.

Dr. BBQ’s rub (combine) NOW THIS WAS YUMMY!!!

  • 1/4 cup salt
  • 1/2 cup sugar
  • 2 tablespoons brown sugar
  • 1 1/2 teaspoons granulated garlic
  • 1 1/2 teaspoons granulated onion
  • 1 tablespoon paprika
  • 1 tablespoon chili powder
  • 1 tablespoon cayenne pepper
  • 1 tablespoon freshly ground black pepper
  • 1 1/2 teaspoons dried thyme
  • 1 1/2 teaspoons ground cumin
  • 1 1/2 teaspoons ground nutmeg

Dr. BBQ’s Sweet and Sticky Glaze
This is what Dr. BBQ always uses to finish his ribs and chicken at BBQ cookoffs around his country.

  • 1 cup ketchup
  • 1/2 cup dark molasses
  • 1/4 cup white vinegar
  • 1/2 teaspoon chili powder
  • 1/2 teaspoon paprika
  • 1/2 teaspoon onion powder
  • 1/2 teaspoon garlic powder
  • 1/4 teaspoon allspice
  • 1/4 teaspoon cinnamon
  • 1/4 teaspoon mace
  • 1/4 teaspoon freshly ground black pepper
  • 1/8 teaspoon Liquid Smoke (Optional)
  • 1/2 cup honey
  • 1 tablespoon hot sauce of choice

Combine all ingredients in a saucepan, stir well, and simmer for 15 minutes to reduce and thicken – a great sauce indeed!

All in all I would say the ribs turned out about a 5/10 to be honest and as anyone knows, you’ve got to try these things a few times before you get the hang of it.  Thanks to Dr.BBQ for the sauce and rub recipes – those I’ll use again combined with Pig Lady’s spare ribs and a slightly different timing method…) The ribs were sticky and gooey however I managed to dry them out completely.  Edible? Yes, would I pay for them in a restaurant?  Probably.  Would I make the same mistakes again?  No way!

So there you are, not a perfect result but good enough to share and prompt myself and others to try this again.

Happy eating and Happy Birthday Cynthia!

This slideshow requires JavaScript.

PS – we then had a “Pimp my Peeps” contest for dessert – I liked Alex’s funeral theme (only a 13 year old would come up with something that morbid!)

In order or appearance:

  1. Peeps watching TV by Lucy
  2. Decapitating Kozak by Roman
  3. “See no Evil, Speak no Evil, Hear no Evil” by Cynthia
  4. A Peeps Funeral by Alex
  5. The Navy Seals raid on OBL Peep by Heather (really not sure where this one came from?!?!?)


Roman’s Wai King Ribs (inspired by Kenny Hotz of “Kenny vs. Spenny”)


Now here’s a recipe that I swore I’d never share  but then again, that kind of goes against the entire point of blogging about your culinary adventures doesn’t it?  Over this past weekend the kids, wife and I spent a day out on the South China Sea with some old friends and a boatload of new ones.  As a treat, we decided to make a few things to be reheated in the galley later that evening.  1. B.O.G. mini burgers with Heather’s homemade buns (see our old post on Bacon, Guinness and Onion burgers) and 2. an old favorite called “Kenny’s Ribs’ – slightly tweaked and renamed to “Roman’s Wai King Ribs.” Thanks Kenny for the inspiration…and tell Spenny he’s a LOSER!”

Here’s the recipe for what can only be described as OMG Good!

  • 2 racks of baby back or side ribs (chopped into bite sized pieces- ask your butcher to do you a favour)
  • 3/4 cup of molasses
  • 1/4 cup of honey
  • 1 bottle of cheap Shiraz – don’t bother with the good stuff – though a 750 ml bottle of guinness makes for a great result as well
  • 1 bulb of garlic – peeled and diced
  • 1 fist sized piece of old ginger – peeled and diced
  • lightly toasted sesame seeds
  • 1 Tbs corn starch

Put almost all of the ingredients into a deep pot and bring it to a boil for about 50-60 minutes – during the process add the rest of your wine, garlic, ginger, molasses and honey, stirring occasionally to ensure nothing sticks to the bottom and ensuring an even coating.

Once the ribs are practically falling of the bone, take them out gently and place them in a medium sized metal bowl. Now for the science.  Take out a few ladle-fulls of the stock that’s remained in your pot. Add about a tablespoon of corn starch and whisk it until the starch dissolves.  Then add that mixture back into the pot, stirring on low heat until you get a tar-like, beautifully rich and tasty, instant BBQ rib sauce.

Pour as much or as little of your sauce onto the ribs and toss them in the metal bowl.  Anything that falls on the floor is yours to try…I dropped about three pieces thank God! Now, toast your sesame seeds in a shallow pan, ensuring they don’t burn and then sprinkle over the ribs.  The last step – put them on the grill and “crisp” them up – a little char here and there just adds to an already amazing set of flavours.  You  can make these up the day before (as I did) and reheat them but truth be told, they’re out of this world fresh off the grill.

Happy sailing! Roman

This slideshow requires JavaScript.

The Magic Behind the Ribs – Thank you “Pork Lady!”


Hi everyone… if you recall my advice on a good grilling its all about the quality of the ingredients you use.  In the case of our now regionally famous Fred Flintstone pork ribs, I wanted to share with you the lady behind the cut.

Simply known to us as the “Pork Lady”, our good friend at the West Coast Market can be found butchering massive cuts of pork from the wee hours of the morning until late in the afternoon.  Her precision, that of a surgeon. Her smile could melt an iceberg and her prices…well, that’s the best part of all!

Her prices are phenomenal and I doubt you’d get ribs of this quality for this price anywhere else on the island. $60 for 3.2 kg of ribs…NO WAY! It pays to be a repeat customer and a smile cost you nothing in return.  She’s a blessing and we owe many a good burp to her mastery of the butcher knife!

The meal preparation of course is no different than one of our earlier posts….I won’t repeat myself however I did want to upload a few pictures just to get the taste buds jealous!

Here’s the link for the recipe and process: https://biggreenasianegg.wordpress.com/2011/01/29/fred-flintstone-ribz/

Thanks for reading and bon apetite!

This slideshow requires JavaScript.

Baby Back Ribs with Seared Canadian Scallops


So the ribs are the same recipe as the Fred Flintstone ribs but this time using baby back ribs rather than prime rib. It was Chinese New Year so we got them from Hubers butcher rather than the wet market but I really love the quality of Hubers produce.


Surf and turf

In fact thats how we ended up with the scallops because we were browsing while buying the ribs and just fancied them as a side. The scallops recipe was the one in the Big Green Egg Cookbook unfortunately again because it was Chinese New Year there was nothing in Cold Storage so we had to improvise with nectarines and it still tasted good. We will try this one again but next time hopefully we can track down some mangoes.


Nothing but bones

Fred Flintstone Ribz


So Roman has been tinkering around with this recipe for a while. Different rubs, different sauces, different cooking methods and just lots of practice. We had 11 people coming over for dinner and he was determined to get it right so warm up for this night included a practice session on the Tuesday night which meant we were starving waiting for the ribs to be finished which was 9.00pm.

It was worth it because by Jove I think he’s got it. Here are the step by step photos

Rubbing the ribs

The secret to any incredible result is what you start with.  So, for this little ditty, we got us some Fred Flintstone-style ribs from the West Coast Market.  If you remember the opening sequence to the Flintstones’ cartoon, the family car flips over when the waitress places the Brontosaurus Ribs on the side of the car…these were just about the same size!

Moving along, you have to start with the dry rib rub, Roman has been favoring a recipe from Righteous Urban Barbecue in New York. Don’t over do it here but make sure you’ve got an even coating that will explode with flavor no matter where you bite the rib. Have your egg pre-heated to 275F and insert the place setter, drip pan, grate and rib rack.

Ribs after 2-3hrs

It is really important at this point to try and stabilize the temperature before you add the ribs. This is also a good point to add in a handful of presoaked wood chips.  All I can get at the local store is Hickory but I must say, the strong smokey taste adds to the result.  At this point add the ribs, close the egg and patiently cook for around 2-3hrs depending on the thickness of your ribs. Again it is really important that you have stabilized the cooking temperature. Try not to peek…the egg must be trusted!

Steeping your ribs

The next step is steeping the ribs. You need to create tin foil packets for each rack and in the base of each pack sprinkle brown sugar and honey before placing the rack in on top. Then sprinkle in brown sugar and honey on top of the rack pressing it in very gently to make sure it sticks. Then pour in about a cup of apple cider and seal up the packet.

After 60mins

Do this with all your racks and return to the grill for around an hour. After an hour has passed take your ribs out of the packets and smother in your favourite barbecue sauce, which in the Matla household is currently the Kansas City sauce recipe with a few modifications out of the Big Green Egg cook book. At this point return the ribs to the grill for about 30mins then remove and wrap tightly in tinfoil and a tea cloth and leave to rest for about another 20-30mins (if you can wait that long because by this point they smell incredible).


Finished Ribs

Heather was never a big rib fan until these ribs and now she can’t get enough of them.