 Let me start this post by wishing my lovely bride Heather the happiest of birthdays! May you always have health, happiness, laughter and BBQ in your life! Love you madly darling!
OK, so one joint of meat fed about 30+ guests but that single joint of meat also yielded 4 or 5 separate surprises too. The challenge was to ensure that every piece of this standing rib roast when to good use. I purchased this roast from our friends at QB in Jurong during our usual 6 week stock up shop. $150 is not a cheap piece of beef but if you treat it respectfully, you can yield an incredible amount from one standing rib roast.
So the first thing was to remove the rib bones. I watched a great video (click here) by Chef Paul Malcolm who shows his students the things to do to an OP roast. Sharpen your knives and have some fun learning how to trim your beef into a work of art! After removing the rib bones, I then removed the fat cap as well as any large pieces connective tissue, any big chunks of fat and the silver skin. Save all of this in a metal bowl for later use! Now take your roast and ensure you pat it into an even cylinder shape. Get some butcher’s twine and truss the roast with a piece of twine every 1.5 inches. This ensures a uniform cook and it looks impressive as well! Now you’ll dry brine the roast for the next 24 hours. Dry brine? Simple! Liberally salt your roast with Kosher salt. Don’t be shy here. Once you’ve covered all of the roast, wrap it tightly in cling film, put it in a dish and leave it overnight.
Now take your fat cap and trim it into small pieces. I ran the chunks of fat through my Kitchen Aid sausage grinder (twice actually!) Gather all that slimy guck into a medium sized saucepan and put it in the oven at about 300F. Because I had run the fat chunks through the grinder twice, my rendering time was reduced significantly to about 30 minutes. I then ran the buttery liquid through a number of fine strainers removing any small pieces of meat. Let that sit in a container that can be closed. Once it starts to cool down and harden, put it in the fridge. Now you’ve made tallow which is amazing to cook with (try tallow, garlic potatoes if you can!!!)


Any meat that you manage to trim, save it! Put it in a bowl and cover it with cling film. I made a wonderful steak and eggs for breakfast this morning to help with the hangover!
I then took the ribs, sliced them and prepared to smoke them on the mini big green egg! I used Meathead Goldwyn’s method for the ribs – click here – My recommendation would be to half the amount of black pepper – these ribs were delicious but definitely a bit too peppery for my taste. Note for future!


We saved the bones for making a beef stock afterwards. Simple cover the bones with some boiling water (with a beef stock cube or two mixed in.) I added a few cloves of crushed garlic, 4 dried mushrooms, a bay leaf and some dried oregano, thyme and sage. Let that boil then simmer for 2 hours. Set it aside and you’ve got a beautiful thin beef sauce for your roast.
Now fast forward to the morning of the roasting. You’ll start your morning by preparing your herb paste that will ensure an amazing flavour and a crust like no other.
- 2 tablespoons freshly ground black pepper
- 2 teaspoons dried rosemary
- 2 teaspoons dried thyme and oregano
- 1 teaspoon garlic powder
- 1 teaspoon onion powder
- 1 teaspoon paprika
- 1/2 teaspoon cayenne powder
- 5 tablespoons olive oil

Mix together the dry ingredients and then add the oil. Take a small whisk and stir it all together. Let the paste sit for at least an hour so that the oil absorbs all the herb flavours. Once that hour goes by, take the roast out of the fridge, unwrap the cling film and place the roast back in a dish that can catch any of the paste that you’ll put on. Make sure you massage the paste into the meat thoroughly. When ready, wrap the roast again in some clean cling film and put it back into the fridge for as long as you can – you’ll go from fridge to grill so the longer the paste can penetrate the meat, the better!
Now, set up your grill for indirect heat and stabilise your temperature at 225F (107C) – add a small bit of wood for smoke. I used whisky soaked oak for this roast. Don’t overdo it here, just a kiss of smoke will do the trick! Set up a drip pan under a flat rack that you’ll place the roast on. I added some hot beef stock to the drip pan, ensuring about 2 inches of liquid across the pan. Remove the roast from the fridge, unwrap and squish any of the remaining herb paste onto the roast. Now insert you thermometer probe from one end ensuring the tip ends up smack in the middle of the roast. You’ll aim for an internal temperature of 120F at which point you’ll take the roast off the grid to crisp it up. This method is aptly called “reverse searing.” It ensures even cooking, low and slow and then finishing it over super high heat which will create a crust across the entire roast.
From start to finish the roast took just under 3 hours to get to absolute perfection. When your temp probe pings you at 120F, remove the roast and then set yourself up (carefully) for direct heat. Crank up the flames to as hot as the grill will go. On a BGE, this is done in a minute or two. Get a long set of tongs and keep the lid up. You want to ensure you’re cooking the surface not the middle of the roast. This process of crisping up the outside takes about 10 minutes. Roll the roast around ensuring you’ve got a uniform bark. I was running a small leg of lam roast next to the beef. They both reached the searing temperature at the same time. Something to be said for good planning and figuring out your maths! Remove the roast when it hits 133F (56C) – as the roast will cook just a bit longer, that will get you to an internal temperature of 135F which is also known as the Nirvana of medium rareness!
I let the roast rest for about 5 minutes then snipped off butcher’s twine and thinly sliced the entire roast on a 45 degree angle. I plated the beef, carved up the lamb and no more than 15 minutes later, it was ALL gone! We had some pretty hungry guests clearly! Sadly, the birthday girl and I didn’t get any of the meat but I suppose when you’re throwing a big party, happy and properly fed guests are the priority. Let me tell you, we’ve thrown some epic parties in the past but this one, took the birthday cake! There were absolutely NO leftovers. Not the beef, or lamb, or pork ribs, or sausages…not the salads, breads, or desserts. We woke up in the morning (with splitting headaches) and thankfully I remembered the offcuts of the roast. I fried them up in some tallow along with two eggs and some super strong Vietnamese coffee.
The last piece of the roast that went were the bones. Sparky, Nala and Bailey made out like bandits. (If you hadn’t guessed….these three are the dogs of friends!) I reckon those three were the happiest of all!
All in all, a perfect evening with perfect friends and a perfect wife! Happy birthday again Heather!

Look at the queue for the food… I’ve seen smaller ones at the Hawker Centre up the road!
Overall Heather Rating: 10+++/10
This slideshow requires JavaScript.

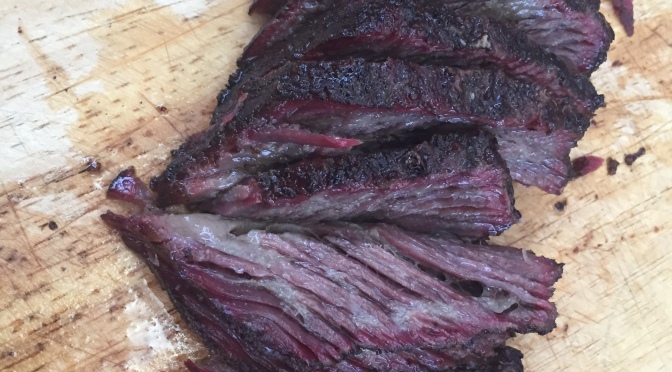
 Hi fans, here’s a great recipe we shared with good friends a few weeks back. This cut of beef, the short rib, has to be one of my favourites to eat. Once smoked between 8-10 hours, this meat literally drops from the bone and it’s juicy, flavourful and absolutely amazing to devour.


